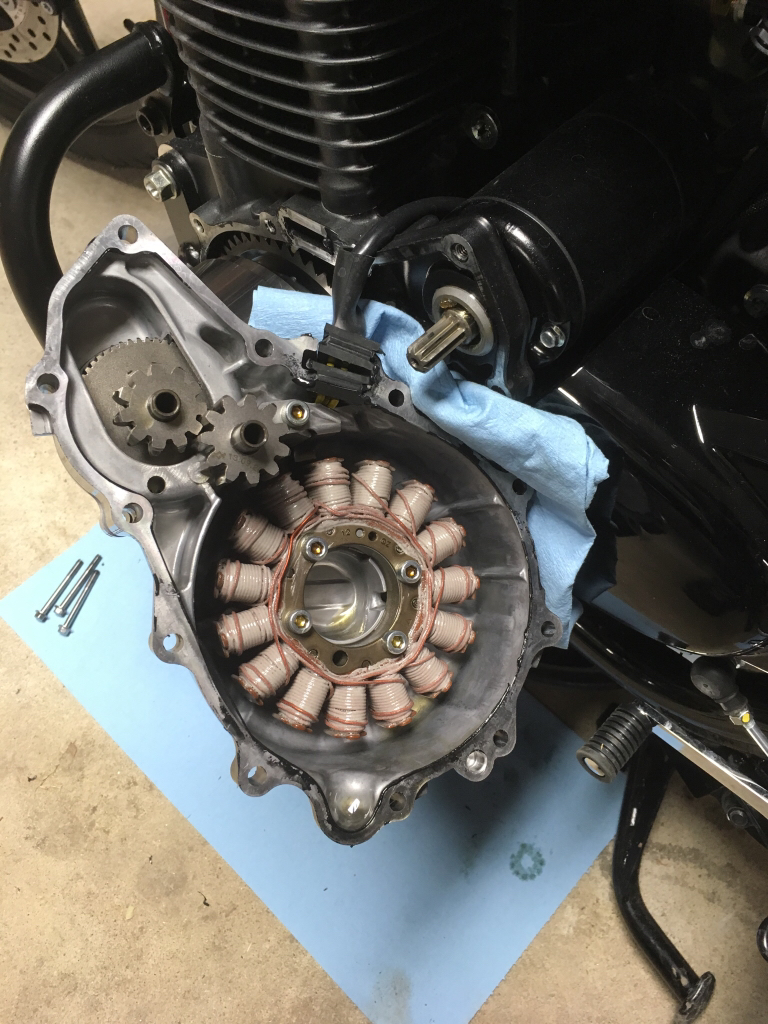
Crank Case Cover removal?

JF Coastal_imp

Been there
Thread starter
Anyone ever remove this before ? Is this something I can do, or do I need to take it to the shop. Got a replacement cover and want to get bike looking perfect for potential new owner.

Any input would be greatly appreciated.
 
Yes, you can do it, but have you ever done it before? If not, watch some youtube videos. It's not hard, just a pain in the a** if you screw it up. I have never done it on the CB1100, but most bikes are alike in this respect. If it is like any other I have done, this is what I do...

You will also need a new (I'd get OEM Honda) crankcase gasket to go between the case and the block. You will also need tools to strip the old gasket off, new plastic paint scrapers work well, plastic razor blades, a brand new wood-chisel if you are VERY careful. Be careful doing this job, b/c you do not want to make imperfections in the surface of the block. This will make you gasket seal poorly, and you will get an oil leak. You will need gasket sealer. And something to catch some oil that will spill out. Be gentle with everything!

Prep - drink two beers, turn on the radio/smartphone/CD player. Get a chair to sit in that will be comfortable working in that area of the bike (a low one).

1. Remove the old one. Don't be a jamoke - get the right sized ratchet. I think it will be an 8mm or 10mm (most are). Gently loosen the bolts, work your way around the gasket, loosening each of them a few twist at a time (not one at a time) until they are all loose. Once they are started you can remove them with your fingers. if you are lucky, the cover will come off on its own. If it doesn't, GENTLY tap it with a rubber mallet until it falls off.

2. Remove the old gasket from the block. If you are lucky, most will come off with the cover, but if you are like me, you are never lucky, and lots of the old gasket will remain caked to the block's contact surface. There are many ways to do this next step (and I am sure others will point out why mine is wrong), I like to hose it down with some WD/40, and leave it for a few hours. This seems to soften the gasket a bit. Then I VERY carefully scrape off all I can with a plastic paint scraper, this should get most of it, but sometimes not, and anything that is left I remove VERY carefully with a brand new razor blade or wood chisel, being careful not to ever let the blade dig down into the metal. Keep it very flat.

3. Clean it up with gas, or whatever toxic solvent you have sitting around - MEK, paint thinner, gas, etc. just make sure both sides are VERY clean. At this point check the bottom of that cover area and make certain that nothing has fallen down there. If there is anything, wipe it out with a clean cloth.

4. Take you new case cover and put some gasket sealer on the contact surface. You don't need to go nuts if you put too much it will be a mess. Make sure all the holes aligned well. Gently press the cover down into the sealer. Be careful not to get gasket sealer on the block side of your cover.

Intermission - Go drink two more beers. Wonder why they always play the same s*** on the radio. Screw around in your garage. Basically, give the gasket 30 mins minutes to set up and get a little tacky. You can even wait overnight if you want.

5. Take your cover, and gentle and carefully apply clean engine oil to the block side of the contact surface. Again, you don't need to do a ton, it will just make a mess.

6. Place the cover gently back in place, and put the screws back (add red thread locker if you want, but JUST A TINY DAB!) in the same way you took them out, by hand until the meet resistance, then a few gentle turns each, so the cover goes on in a flatish way, not one corner here, then another one, then another one. Some people will say "finger tight" then 1/4 turn more, but you are making the gasket with pressure, so maybe a full turn to a turn and a half. Just do not over torque it, because block metal is softer than you think, and stripping a hold in you engine sucks in many, many ways.

7. Leave it alone, let everything dry overnight before cleaning or riding or anything. Then you should be good to go! The next time someone takes the cover off, because you have oiled one side of the gasket, the gasket will stay with the cover and the block will be clean.

 
Good write-up. I removed the crankcase cover from my CB400F about thirty five years ago without the proper tools. JIS screwdrivers? I don't think the term had even been invented. Instead, using my JC Whitney el-cheapo impact driver and a handful of dull, rounded #2 Phillips bits, I laid waste to every bolt on that thing in no time.
 
is this a Honda thing? because the gasket on my gsxr cracked (leaking oil) and I removed the cover and the cracked gasket just came off. no scraping needed. put the new gasket in place and bolted it up, torquing to spec in a skipping pattern much like you would lug nuts on a tire and, no worries.
 
I rebuilt a couple of BSA Lightning motors decades ago.

The removal of the first 1966 crankcase cover was easy because gasket sealant was not used by the factory.
It was important to make note of where each screw went when you removed them because the Lightning has several different lengths.
I don't whether or not the Honda does.
The BSA had a flimsy paper gasket.
I gave each side a thin coat of Vaseline so it would stick somewhat to the crankcase.
That allowed me to smooth it out and place it properly.
Secondly the gasket could move some without tearing or folding when the cover and screws were added.
The screws and cover were placed loosely from the center of the top around to the center of the bottom.
That allowed the gasket and cover to seat properly.
The screws were then tightened.
That case did not leak.

The second case was on a 10 year old 1971 BSA Lightning.
The gasket had been treated with Red Hermetite sealant.
Because it could not move, it had folded and torn in places.
The owner smeared the cases with Red Hermetite to stop the leaks.
After 10 years on a hot engine, it was a pain to remove and clean.
That was about 40 years ago, so I don't remember what nasty solvent I used to clean it. Could have been a paint stripper.
The new gasket was added as described above and did not leak.

Red Hermetite was the go to sealant in those days.
But it was supposed to be used when putting metal on metal together.
Unlike a lot of the Japanese crankcases, the halves of the BSA crankcases were split vertically. So they would leak if not sealed properly.
I used a stiff artist's brush to a apply a very thin coat on each case.
There were streaks in the first coat. It was left to get tacky.
Then a second thin coat was applied that smoothed everything out.
The crankshaft, heavy flywheel and transmission made it awkward to put the cases together. Just to make more interesting, one of the rear motor mounts and it bottom bolt had to added before the cases were closed. If not, the bolt could not be added afterwards.
Love British engineering!

If thin coats were used, the Hermetite did not squish out and make mess when the cases were torqued together.
Unfortunately a lot of owners did nor realize this and the cases would leak.
They would then add glops of Red Hermetite over the leaks and make a ugly mess.
Fortunately they would get a second try 10,000 miles later when the motor had to be rebuilt.
And we complain when the valve clearance has to be checked every 16,000 miles on our Hondas.
 
Guys- RTFM!!

There is no gasket on our bikes- just sealant.

Put the bike on the center stand, drain the oil, remove the side cover, clean the mating surfaces, apply new sealant as shown in the manual (some of it goes on both sides, but only in certain spots), reinstall side cover, refill oil. Done.

Do not just guess at the bolt tightness as everyone will overtighten that way. If you don't have a tq wrench, you should not be working on a motorcycle / car.
 
PowerDubs_imp said:
Guys- RTFM!!

There is no gasket on our bikes- just sealant.

Put the bike on the center stand, drain the oil, remove the side cover, clean the mating surfaces, apply new sealant as shown in the manual (some of it goes on both sides, but only in certain spots), reinstall side cover, refill oil. Done.

Do not just guess at the bolt tightness as everyone will overtighten that way. If you don't have a tq wrench, you should not be working on a motorcycle / car.
That does make things easier!
 
Thread starter
Thanks everyone. !! Especially Powerdubs for making it simple. Shouldn't be a problem at all, that's something I can definitely handle.
 
Which side are you replacing? The right hand side is a direct swap- the left hand side has the stator inside.

349d6f095b5797269a49b35d1d4a43a7.jpg
 
PowerDubs_imp said:
Guys- RTFM!!

There is no gasket on our bikes- just sealant.

Put the bike on the center stand, drain the oil, remove the side cover, clean the mating surfaces, apply new sealant as shown in the manual (some of it goes on both sides, but only in certain spots), reinstall side cover, refill oil. Done.

Do not just guess at the bolt tightness as everyone will overtighten that way. If you don't have a tq wrench, you should not be working on a motorcycle / car.
Men don't read manuals.
Until we screw things up.
:rofl:
 
Nortoon_imp said:
PowerDubs_imp said:
Guys- RTFM!!

There is no gasket on our bikes- just sealant.

Put the bike on the center stand, drain the oil, remove the side cover, clean the mating surfaces, apply new sealant as shown in the manual (some of it goes on both sides, but only in certain spots), reinstall side cover, refill oil. Done.

Do not just guess at the bolt tightness as everyone will overtighten that way. If you don't have a tq wrench, you should not be working on a motorcycle / car.
Men don't read manuals.
Until we screw things up.
:rofl:
Men don't read manuals.
Until we screw things up.
:rofl:
:rofl: :thumbsup: :thumbsup:
 
probably shouldn't work on this Honda without a shop manual sounds like to me. never had a manual for the gsxr. guess i just got lucky.

dubs, if you would be so kind as to post from the manual where the sealant goes and doesn't go, I'm sure there would be many appreciative.

that said, I do get a chuckle at folks who talk about gaskets moving, folding, shifting, etc. because I have always put the bolts in whatever part it was with grease and then put the gasket on the part with the bolts to line it up and hold it in place.
 
jimgl353_imp said:
probably shouldn't work on this Honda without a shop manual sounds like to me. never had a manual for the gsxr. guess i just got lucky.

dubs, if you would be so kind as to post from the manual where the sealant goes and doesn't go, I'm sure there would be many appreciative.

that said, I do get a chuckle at folks who talk about gaskets moving, folding, shifting, etc. because I have always put the bolts in whatever part it was with grease and then put the gasket on the part with the bolts to line it up and hold it in place.
I learn something new every day. :thumbsup:
 
hang out at some club racing events sometime. you can learn a lot real fast. once saw a dude tear his forks down between races. I was like dang!

another really good example is the leaky cover I mentioned... another racer noticed the toe of my boot was shiney. He said you've got an oil leak. I asked why he would say that. He said the toe of your boot is shiney. it's got oil on it. He was right.
 
MODERATOR'S NOTE

Apologies both to PowerDubs and jimgl353, but I have had to remove these images as, so far as I understand the law, publishing them here breaches copyright and may expose our esteemed form owner to potential grief. If that's wrong, I'll certainly not stand in the way of their republication.

Cormanus

Sent from my iPhone using Tapatalk
 
The left side is the stator cover. I had to replace mine after I wrecked it. No gasket and if I remember there was little to no oil in it without draining oil. The hardest part was the magnets. Once you remove the bolts, the cover will appear to be stuck. It is the magnets hold it together. No manual required...
 
I know this thread is old, but I thought I would chime in with my experience. To make a long story short, I was unable to remove my cover. I drained the oil, removed all the bolts, got a rag and mallet and . . . . the dang thing wouldn't come off! I'm not sure if someone had removed it before me and applied a super gasket of some sort, but I was in my garage for two hours tapping and pulling and cursing.

In the end, I had to refill the bike with oil, apply some JB Weld to the hole in the stator cover (side-swiped in traffic, that's another story) and take it to the shop with my tail between my legs.

On the plus side, because I provided all the parts, the shop bill was only $90. In hindsight, I would've saved myself a lot of grief had I taken it there to begin with.
 
Well, that is how we all learn ; some jobs are easy and other times it can be a pain. It is like having kids : they can be wonderful sometimes and other times a pain in the neck.
 
Back
Top