Delkevic exhaust, experience?

m in sc_imp said:
*update*
after a few weeks, and the system 'settled' in, the pipe from the collector to the mid pipe had shifted 'back' a bit more than i liked, was barely hanging on at the front gasket. this is the pipe with the hanger bracket. so, i made a 1" straight bracket to mount to the frame hanger to the midpipe, pushing the whole thing forward a bit into the collector. it was literally a 3/4" wide, 1.5" long 3/16" thick piece of steel with two 5/16" diameter holes drilled 1" apart from each other. i bolted it with a short M8 bolt and nut to the exhaust pipe bracket,, tightened it, and them mounted it back on the bike. I slid the whole system forward by loosening the clamp on the muffler and sliding it up in there. took maybe 30 mins. Maybe my bracket on the pipe was welded in the wrong place? not sure but easy to sort. (ptobably had more to do with headpipes shifting/bowing forward after a few heat cycles?)
"m in sc", do you have a pic (or can you take one) of the straight bracket you made and how it was installed? I have a Delkevic full system in the garage waiting to be installed.
Thanks!
 
Are the delkevic headers free flow? No catalytic in the system? I run a shorty GP exhaust tip but I've been wanting to get away from the rest of the restricted system. Just haven't had the money laying around for the titanium racing exhaust.

Sent from my SM-G965U1 using Tapatalk
 
m in sc_imp said:
yes. no birds nest in there. it made a notable difference in acceleration. the whole system i got was under 400 bucks, stainless. very very happy with it. finally, 3 years later, going to send the ecu off to get reflashed next week i hope.
Ah very nice, I actually had an issue after the ECU flash where my bike did not want to just cruise at highway speeds. The bike wouldn't run smooth at 60 or 70 mph. I would have to accelerate to 75 or 80.

A power commander fixed the problem but if I could do it again maybe i wouldn't have done the ECU flash in hindsight. All I needed was to eliminate the speed limiter but my mechanic had them change the ignition timing and raise the speed limiter also.

Now I inevitably have to do a custom tune with the power commander which will set me back another 500$ but I'm not gonna do a custom tune on a nearly stock bike... so I'm boring out the intake funnels and gonna do a full exhaust. Then do the custom dyno tune.... you see where one expense leads to the next haha
From what I've seen on here I should be able to get 100hp to the rear wheel. Which I think will happen sooner than later now that I could use a delkevic header instead of a full yoshi :)

Sent from my SM-G965U1 using Tapatalk
 
So, I started working on the CB this weekend I just acquired. I have almost all the aftermarket stuff I ordered in my possession (more posts on those later).

So far, put on the GIVI chrome rack (will show in another post), and started the Delkevic full exhaust installation. I got the 14" CF can to go with it, which looks terrific. I took the stock exhaust off. I started at the front loosening (but not removing) the header nut caps, and worked my way back. If you follow and tug the stock O2 sensor, you can work your way up the frame to find where it is held and get it out. I loosened the engine cover 8mm bolts, then worked up to the frame tie down near the boot.

Since I do not have a shop manual and any torque specs, I used an inch-lb torque wrench to undo the 8mm bolt with the harness tie downs to get a feel for the amount of torque applied to the bolts. Not the best way, but better than nothing. Set to 120 inch-lbs, the wrench clicked without breaking it free, so set it to 144 inch-lbs (12 ft-lbs), and it broke free. I removed those attached C-clips, and then torqued them back with the O2 sensor harness removed using 144 inch-lbs. That seemed a little tight, so might use 120 (10 ft-lbs) next time.

With a small flat head screwdriver, you can loosen the zip tie in the frame up near (under) the clear silicone harness boot containing the O2 and another connector, just enough to extract the O2 sensor connector out of the bundle without undoing the zip tie entirely, leaving the other harness bundle undisturbed, and working it down and out of the frame. I left the zip tie loose for now, as I am not quite sure what I need to do to install the PC and the Autotuner. The rest of the removal was easy.

For your reference, I weighed the stock exhaust parts using a digital postal scale, and arrived at a total removed weight of 22 lbs 14 ounces!

Then I weighed the full Delkevic parts using a box I zeroed out and came up with a weight of the full Delkevic system for a total weight of 15 lbs 2 ounces. That includes the 14" CF canister w/ baffle left in, so if you buy the shorter or longer can, you can estimate the difference for your system. That was a savings of 7 lbs 12 ounces. Now if I loose 15 lbs myself, I can further improve my hp/weight ratio!

While the stock exhaust was off, I figured this was the one and only opportunity to clean up the motor w/o the headers in the way. My recently acquired CB only has 5900 miles, but there was significant stuck on crud and chalky crust there. I used some kerosene with a small plastic brush a little bigger than a tooth brush to get in all the numerous nooks and crannies, then wiped it down with an old rag to get most of the kerosene residue off. I include a pic of my happy motor from me showing the love.
ab38ba5a2b7e54ca79deb287b20940f3.jpg


You might note, I went ahead and changed the oil/filter, as it establishes a known baseline for me as the new owner. The oil looked pretty good and did not really need to be changed. No matter. Even though the previous owner gave me a OEM filter, I decided to go with a Proflo reusable filter I had on hand that was targeted for another Honda I sold (w/o the filter). Since I had no idea if it would fit, I took a chance having the OEM on hand if it didn't. Fit perfectly! Awesome! It has a beautiful billet chassis with innards removable to clean with a solvent and blow dry. The surgical steel mesh inside I recall is good to about 30 microns. Not quite as good as the best filters out there, assuming you can even get their specs (you can't), but figured using full synthetic and changing frequently, it should filter just fine. These are not cheap, costing about $100. They only make sense cost-wise if you keep the bike long enough to do 10 or so changes, but it certainly looks better. It has a hex head to easily torque it. Also note, I noticed upon cleaning the motor that there were pre-drilled holes in the protrusions at the bottom of the oil pan. The Proflo also has a pre-drilled hole in the hex head. Surprised why Honda would put those there? Since it would take only a minute, I broke out the safety wire and wired it up, just because I could, not because it needed it at all.
3c9c13dfe2f10a21f5395d2d37ff75f9.jpg


Back to the exhaust. I dry fit everything back to the can just to check the general layout and orient myself to the installation details. Note, Delkevic does NOT provide installation instructions, and there are none specific to the CB on their site! Just a generic one of some limited use.

This brings me to three exhaust questions:
1) What torque is required for the header nut caps?
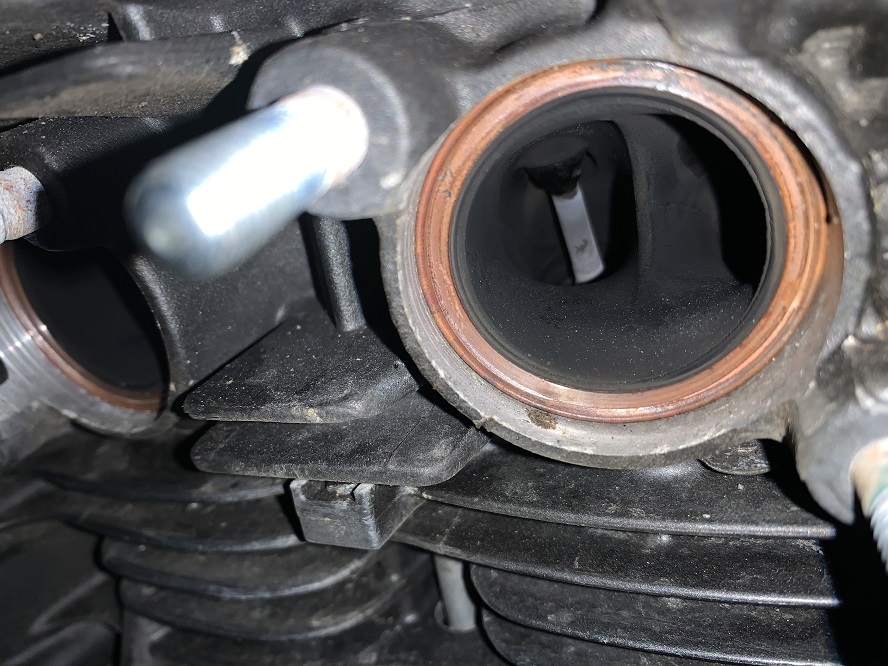
2) There appears to me to be a stock copper gasket in the exhaust manifold output ports where the headers were, because it looks copper colored to me. Was uncertain if I should dig it out, or it was rust, but believe they are copper washers and should come out. Then I replace with the supplied Delkevic crush washers that will seal during the final torquing of the header nut caps. Confirm?
fc752cebee9dec6cf600a52d14267fd6.jpg


3) Did you use rtv on all pipe joints? It seems like a good idea, but am concerned about the working time, and removing them later. Since I have yet to install the Power Commander, it is unclear to me if I should attempt to remove the stock O2 sensor, whether it fits the bung welded on the Delkevic pipe, download the stock (not so right) Dynojet map to start with, and then later install the Autotuner. Note, I have a K&N air filter to install, which I may modify the stock air box (have not decided).

I contacted Dynojet customer service about the maps on their site. They only have two, one for stock bike, and one for an after market exhaust (no air filter). They told me the latter would work. I think they are wrong and being lazy to not have a third map with both an aftermarket exhaust and air filter. I think both will dramatically lean out the system. But, thought I would just try it with the PC installed as a first starting point after the Delkevic is installed. Ride it and evaluate the response checking for stumbling or popping on decel.

The autotune intimidates me, even though I am an EE. I don't have a clue where the Dynojet O2 bung should be welded on the new system, and there is a medusa harness with a whole bunch of connectors and also raw stripped wires. I was hoping to not have to become an expert in the CB wiring harness design.

Any help you could provide on my questions would be appreciated.
Jim
 
peterbaron_imp said:
Exhaust pipe joint nut (M8/thread diameter, 8 pcs) - 22 Nm, 16 ft lb
Thanks Peter!

Now I am pretty sure I am supposed to dig out those (what looks to me like) stock exhaust crush washers.
Am looking for some confidence before I get them out, and hopefully without scratching the ports. Any handy tips on that would be appreciated.
In the Delkevic General Instructions link (asterisks added):
We suggest our products are fitted by a professional motorcycle mechanic. Most of our pipes can be fitted using our general fitment instructions. ***********If you are having difficulties fitting your system a few common issues is the new gasket is not installed correctly, the old gasket is not completely removed******** and trying to fit our slip on system to a different companies downpipes. We fit all pipes to the bike to ensure proper fitment and tested before any pipes are made to sell. If you are still having difficulties installing your system please contact us at sales@delkevic.com

I am thinking of starting with a flat end Exacto in the crease, and prying, followed by some graduated flat blade screwdrivers.
Maybe over-thinking/over-worrying it. Just want to hear from the experts.
I am thinking if you don't remove (presumably) the stock ones, the new crush might not properly seal, and the system would be 2mm or so too far forward.

BTW, as I stated, I was contemplating doing the full system and PC w/ autotune in stages. If I install the full system and only the PC (w/o autotune), then I might have to remove from the collector on back to modify the exhaust to accept the Autotune and provided bung for the O2 sensor. I am not sure if that would require loosening, or removing the headers again, and whether I would need new crush washers. Hopefully, it would not require removal of the collector from the headers, or it could be problematic lining things up in reinstallation.
I also, if done this way, would not use any supplied RTV until I am convinced the system is going on to stay. As you can tell, I have concerns about a lot of things....
Looking at the stock O2 sensor (not yet sure if I need to remove this to use with just the PC), it is tightly surrounded by the stock exhaust heat shield. I would prefer not to hack that up, as I might be able to sell my pristine stock system to offset the costs. It looks like a special tool is needed, as a normal socket or wrench is not going to fit in there due to the attached O2 sensor wire. I am thinking I might need to create a special tool that would be a socket with a channel cut out for the sensor wire, to just break the sensor loose before it could be extracted.
 
Easy to get the old gaskets out with "dentists " pick , set of them are cheap but very handy , they have different types in the set.
 
Houtman_imp said:
Easy to get the old gaskets out with "dentists " pick , set of them are cheap but very handy , they have different types in the set.
I have those picks. So you agree those need to come out then.
 
Cormanus_imp said:

Well truth be told, there are a lot of bike models out there. Perhaps if they exhaustively tested every model and combination and permutation of model vs aftermarket exhaust and filter, the initial cost (passed on to the consumer) of the PC would triple. Also if they had the best stock maps for every scenario, why buy the Autotune? That would only have value if you are an air-fuel ratio expert over them, or you just have your own notion as to what it should be given your circumstances. That the map provided with aftermarket pipe and no aftermarket air filter will work, well yeah, but it is not going to be optimum. Maybe still an improvement over just the ECU by itself.

I intend to do the exhaust in stages. Maybe just shakedown after temporary dry fit (no RTV and reused stock exhaust manifold gaskets), see how lean it is mated to the stock ECU, then return to do phase two with just PC and provided map for the CB. Then install the Autotuner with the welded wideband O2. Phase three with Delvkevic provided crush washers and RTV joints to properly seal, then tune. I assume multiple shakedowns will be required for phase 3A, 3B, 3C...Haven't fully decided yet. I do know I am anxious to ride the bike. I just got my tag Wednesday (2 days ago), and really have not had any bonding time with it before yanking the stock exhaust....
 
M in sc, thanks so much for the pics, they really helped with the header pipe install to the collector. Without it, I would have been trying to figure out which pipe goes to what cylinder forever. Much thanks! This system is nice, but lots of connections compared to stock. You have to wiggle jiggle and put a fair amount of pressure to get the O2 pipe to meet the hole for the frame bolt. I didn't use sealant on anything and see if it leaks...
 
I got the full Delkevic system with a 14" and love the sound but am having problems with the centerstand pipe rotating and causing the chain to rub on the centerstand. Anyone else figure out how to keep this pipe from rotating? I've tightened the bolt super tight and it's probably ready to strip out and still it spins. Thanks!
 
Still wanna grab a set of delkevic headers and collector to de-cat my exhaust for alot cheaper than getting the full yoshi now. But would it have the center stand stop if im not using their muffler? Or is the center stand stop built into the muffler pipe??

I would prefer to keep using my shorty moto GP "Muffler"

Sent from my SM-G965U1 using Tapatalk
 
Houtman, that is a great idea! Thanks again for your help!
MVK24 the stop isn't part of the muffler but the short pipe leading to it. It is the pipe between the muffler and O2 sensor pipe. Their systems are nice and come with everything you need. The only problem is they don't really have instructions, it's not that difficult to install after you figure out what they meant by their 1-4 numbering system. I found the order on a pic from this forum. It helps a lot since holding 4 header pipes by yourself is not easy. Once that's figured out, it's pretty straight forward.
 
frank_imp said:
Houtman, that is a great idea! Thanks again for your help!
MVK24 the stop isn't part of the muffler but the short pipe leading to it. It is the pipe between the muffler and O2 sensor pipe. Their systems are nice and come with everything you need. The only problem is they don't really have instructions, it's not that difficult to install after you figure out what they meant by their 1-4 numbering system. I found the order on a pic from this forum. It helps a lot since holding 4 header pipes by yourself is not easy. Once that's figured out, it's pretty straight forward.
Very cool thank you! I'll try to jump back on with some pics when I get around to ordering it.

Sent from my SM-G965U1 using Tapatalk
 
frank_imp said:
Houtman, that is a great idea! Thanks again for your help!
MVK24 the stop isn't part of the muffler but the short pipe leading to it. It is the pipe between the muffler and O2 sensor pipe. Their systems are nice and come with everything you need. The only problem is they don't really have instructions, it's not that difficult to install after you figure out what they meant by their 1-4 numbering system. I found the order on a pic from this forum. It helps a lot since holding 4 header pipes by yourself is not easy. Once that's figured out, it's pretty straight forward.
The drill/screw would work, or you could do what I did when mine did the same thing.
I just used a bead of red high temp RTV and a new clamp. Reinstall the end can, tighten it all down and let it sit for at least 24 hours. No more slipping/ turning as the stand makes contact.
 
frank_imp said:
I got the full Delkevic system with a 14" and love the sound but am having problems with the centerstand pipe rotating and causing the chain to rub on the centerstand. Anyone else figure out how to keep this pipe from rotating? I've tightened the bolt super tight and it's probably ready to strip out and still it spins. Thanks!
LikeAFox had this same issue. I'm not sure what he did to fix it. Perhaps he'll chime in.
 
Back
Top