Fuel line connection came undone and left me stranded!

Riko_imp

Road warrior
Thread starter
I had a litte heart attack moment today.

f5db27f465dc028baf32c400dbac85af.jpg

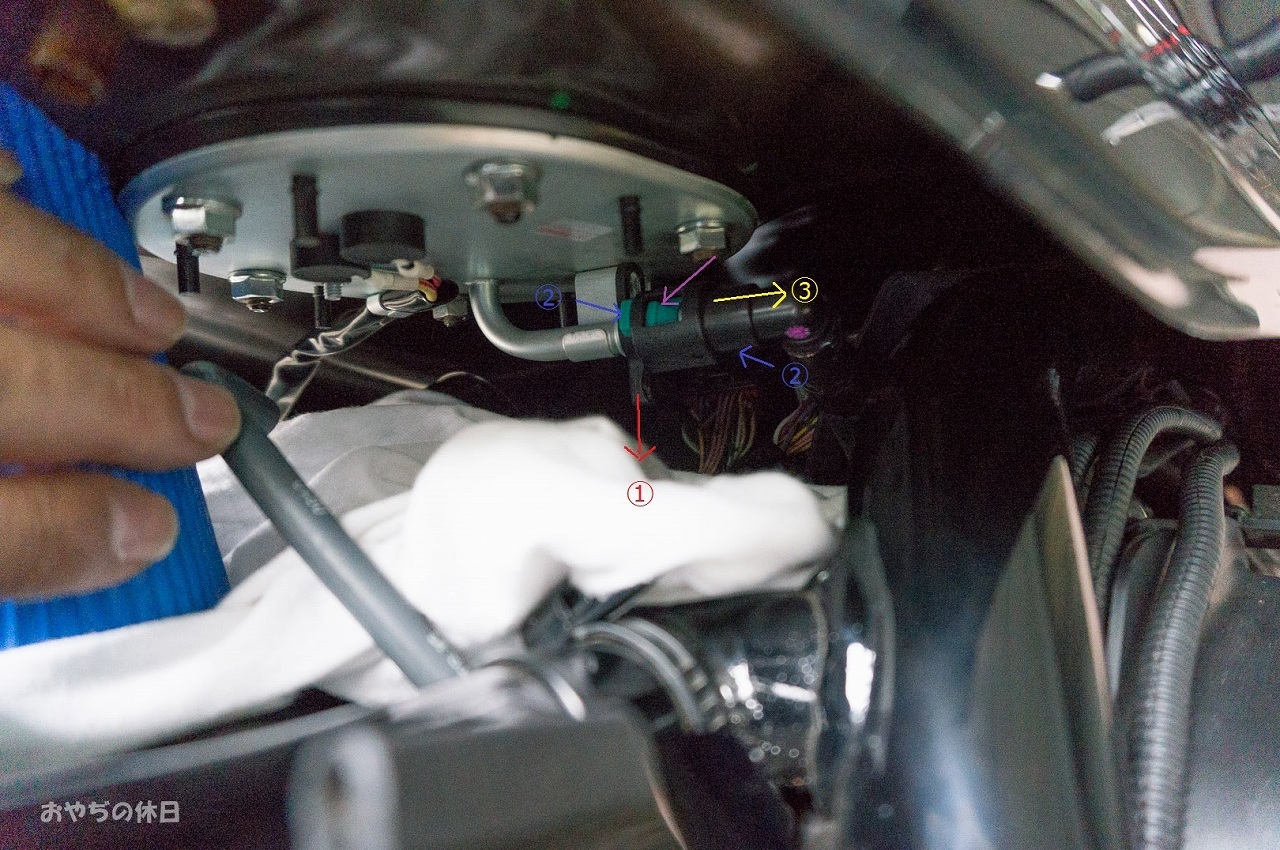
okay, i am talking about the green tab on the picture

its not my pic, I took it from here
http://cb1100forum.com/forum/showthread.php?tid=1675&page=3&highlight=blue+tank

I rode 130km and I was luckely already at my destination...when suddenly I lost all power, oil light went on and looking back I saw a trail of liquid.

When I stood still and wanted to start it again, that went difficultly, I had to rev it to keep it alive but directly after a second or qo I saw and smelled what happened to be fuel spilling from underneath the tank.

It really was pouring fuel all over the bike!!!!!!:@


Me and the guy I met with, someone from a local board who admired the CB and wanted to see one, figured it out quit fast but I did call road assist just in case.
They confirmed the fuel line was lose and fixed it in like 5 seconds :) since we already had the tank lifted.
The mechanic said its 'clicked' in place now...and seeing its a new bike he wasn't surprised to see this issue arise...:rolleyes:
It happens....sometimes....on new bikes.
Bad plugin from the factory perhaps?:huh:

This is how it looks after reconnection:


I rode home :biker: and could not let go what happened, so I took another look and I moved that first black rubber thing a but further in over the green.
I didnt take a picture of it as of now.

But I reaaaaaally would like to see a good picture of a normally connected fuel line.
Just for my own peace of mind....:dodgy:
I could not see how the mechanic clicked it in place.
The problem is you cannot take a very good picture of a connected fuel line with the tank in the way.
But surely someone has better skills than me in taking a picture of that part?


Thx a million in advance!!
 
That's a first for this board I believe
 
That's crazy. I've always hated those quick connectors a but, precisely for this reason.

The connection in the after position looks right. The only thing is that the rubber piece shouldn't be hanging there, but should actually be pressed into place in order to make it impossible for the green clips to be released with the rubber in place. I do t have a pic, but it threads through the centre of the green clips in the little opening in the black plastic.
 
Thread starter
I have this weird superstition, on each new vechicle good moments happen and bad/scary moments.
I just hope this is the worst of the scary moments and I've had my worst share of it :)

ow well, when passing at the dealer to install fork boots, I'll also ask him to also show me the quick connectors.
kmoney_imp said:
That's crazy. I've always hated those quick connectors a but, precisely for this reason.

The connection in the after position looks right. The only thing is that the rubber piece shouldn't be hanging there, but should actually be pressed into place in order to make it impossible for the green clips to be released with the rubber in place. I do t have a pic, but it threads through the centre of the green clips in the little opening in the black plastic.
I pointed out in blue on this picture what I moved after I got home


that black rubber piece on the left is now moved a little bit to the right, so it sits over that small exposed piece of green, that seemed like a final thing that had to be done, it felt like it now sits in place when I moved it...

But if only someone could take a picture from that same angle, it could clarify if it should look like that. :)


I found a site in Japanese, of a first gen. CB
デントリペア
Still dont get the function of the rubber part
25379206fd0338b36aa7b02c315ede39.jpg

0a2974c19bf5b4c421c319610c9cb872.jpg
 
For information. Every time the tank is removed the connector should be replaced by a new one. According to the service manual that is. I can only conclude that the reason for this is that the connector develops a "memory" and, if not replaced exactly as it was, a leak is possible. I have had my tank off several times but have not done so. After the first time I removed and replaced the tank, on pressurising the fuel system, there was a distinct smell of fuel. I disconnected and then reconnected the connector and after that all was good. Since then I have been very careful to make sure that the connector is seated properly. There is nothing wrong with the connector design itself, it's just the position beneath the tank makes replacement difficult, or "tricky", as they say. I need to do another valve check soon so will replace the connector then.

Cheers
And I think that rubber piece is there to ensure the connector stays in place. Like a lock ring.
 
Thread starter
hmmm thx for the info

I think the rubber keeps the plastic connector solid from turning and spinning since its plastic on metal


The connector is now connected, lf course :) but without the rubber piece in its correct place, so tomorrow I'll see how high I can lift up the tank and try to put the rubber in place...

I suspect the connectors werent connected from factory, then again the bike had 2001km on it... so all that time the previous owner had luck the fuel line stayed together? :)
 
"THE BLACK THING" is a cover to keep the junction of the two halves from getting dirty. I see no reason to replace the quick connector if you take it off and reinstall. The blue plastic that is squeezed is pretty tough and I doubt that a few offs and ons will wear the ears that are squeezed to release the thing. To get to it, pull the fuel pump connector off and the tank vent hose and then pull the tank back so it comes out the the stays up front... it lifts up higher this way. Put a pice of 2x4 under the lifted tank. Much mre room for your fingers and you can see what you are doing.
 
Thread starter
thx a million for the clarification! :)

Will try to install the rubber piece first thing tomorrow!!
 
wiredgeorge_imp said:
"THE BLACK THING" is a cover to keep the junction of the two halves from getting dirty. I see no reason to replace the quick connector if you take it off and reinstall. The blue plastic that is squeezed is pretty tough and I doubt that a few offs and ons will wear the ears that are squeezed to release the thing. To get to it, pull the fuel pump connector off and the tank vent hose and then pull the tank back so it comes out the the stays up front... it lifts up higher this way. Put a pice of 2x4 under the lifted tank. Much mre room for your fingers and you can see what you are doing.
That's good George. I don't see a reason to replace the connector or the retainer either, but Honda obviously does. The service manual, page 5-33 QUICK CONNECT FITTING INSTALLATION, says: "Always replace the retainer and rubber cap ....... when the fuel hose is disconnected". The accompanying diagrams show this:

fb51607d4adddd6535d6cad8b2356056.jpeg


115ccd8069e9b82aa7bf2e0ab3207c5a.jpeg


Honda must believe replacing the old assembly provides a risk of leaking. At the end of the fuel tank replacement procedure they recommend testing the fitment at least three times by pressurising three times and add the warning "Do not start the engine" until the tests have proved satisfactory.

So, in summary, unless the procedure is followed, I guess a leak could be expected.

Cheers
 
Thread starter
This is one of the reasons I love a bike specific forum.
And why I love this bike even more, its crowd :) fantastic!

I assume you guys bought the service manual since I cant find a free download on the web of it and I only get the basic owners manual?
 
Put a little bit of clean oil on your finger and rum it on that metal tube. Trust me it goes together easier with that little mod.


2014 CB1100 DLX
2013 CB1100 Std
1990 BMW K75 RT
 
Thread starter
I think everything is in place but the rubber piece wich has to go BEHIND the green piece.

I'll try to do that while everything is in place and ser how that works out...


Thx
 
Riko_imp said:
This is one of the reasons I love a bike specific forum.
And why I love this bike even more, its crowd :) fantastic!

I assume you guys bought the service manual since I cant find a free download on the web of it and I only get the basic owners manual?
If you are going to work on your bike it is definitely a good investment. I've always worked on my own vehicles but if a shop manual is available I will use it as a guide. For instance the oil lube suggested by Elipten is also recommended by the manual. If you want to read and disregard certain procedures then that's your prerogative. "You pays your money ......."

Cheers, and good luck with the job.
 
Thread starter
For the 50cc Ruckys and the big Yami of my dad we found online service manuals.

But if the only available service manuals for the CB are paid versions, I'd be happy to invest in one.
 
Thread starter
hmmm, I cant move cuss, very frustrating, that rubber piece is impossible to findle with with the tank only lifted.

So I wanted to lift the tank as high as possible, much higher than now, but 2 problems:
1) its stuck at the front of the tank.
And here its seems as easy to just lift it up after you removed the only bolt:
Actually, in the vid you do not even see him disconnect the tank from the frame, he cut the crucial part.
I can hardly even more the tank backwards towards me

2) the other hose at the beginning of the tank, the vent line, can I safely disconnect this hose?
Again, dunno what would happen if I removed it as of now, so as of now I'd rather let it stay connected.
This hose could also be the reason I cannot move the tank a whole lot.

PS: there is about 3-4 liter of fuel in the tank.


Awaiting instruction :blush:


EDIT:
okay, I managed to put the rubber piece into place despite the almost zero working space. :banana:
I'll upload a youtube video and a 2 screenshots with a view of how a correct connected fuel line looks like on our bikes (EX model)
 
No worries with disconnecting the vent line. Reconnect it last. As for the tank:

1. Remove the rear mounting bolt and collar ( you have done that I guess).

2. Relieve the fuel pressure (you've probably done that as well).

3. Grab the tank and pull it back and up at the rear. The front of the tank is hooked on to two rubber mounts. They are solid so use some grunt if required.

This should give you a good look at what you are dealing with. When you are ready to replace the tank you need to give yourself as much length on the fuel line as possible. Pull and maybe disconnect at the other end (I haven't had to do this so don't much about that). Put the tank just on the front mounts (stays) to give you some room, using the 4x2 block (or whatever) that Wired suggests, connect the fuel pressure line. A torch, or other illumination helps. When that's done connect the vent line. That shouldn't be a problem, in fact the proverbial piece of possums piddle. Get the tank back in place and carry out the pressure check as described in my previous post. Then crank it up and scrape some pegs :). Lastly, after peg scrapping, have a stress levelling beer, or two.

Mate, good luck. Cheers
 
Thread starter
héhéhé perfect description man!

But it was all about that black rubber thingy that I wanted to get fit in its place, since that was the only "issue" I had after the incident.
Now that is what I have done :)
I did not bother to remove both the fuel line or the vent lin. Lol

Still, thanks a million for this, I am sure many will find this helpfull in the future when they require to replace or remove their tank.

How it was before:


The final result despite having barely enough space to move around, still managed to to put the black rubber thing in place:
(still in process for a HD version)

 
In case anyone else looks at this thread for tips on how to remove/install tank, ALSO if the tank is almost empty, it is a whole lot easier to manipulate than with 25 lbs of gas in it.
 
Back
Top